27 September 2013

Spinach and Roasted Pepper Phyllo Pie

DSC_0031
I have always been a bring-your-lunch to work kind of person. It's cheaper, sure, but I find that overall I like it because it's healthier and the portions are more my size, and everything's usually fresher. Not that there are so many (okay any) lunch options in Algiers, unless meat between bread counts.

DSC_0029

This quick phyllo pie is the sort of thing I make often for lunches. Sometimes it's a tart, or a frittata, something that keeps well and slices easily and is a bit more substantial to my other rotating lunch item, salad. Honestly, I usually make these things slapdash with whatever I have on hand, but this time I've bothered to take some measurements.

As I've discussed many times before (see: baklava), phyllo is not nearly as hard to work with as you think. I don't bother to brush every single layer with butter, but the crust here is really just a lovely vehicle for the salty sweet filling with peppers and olives. You can make this with or without cheese - since I'm lactose intolerant I skip the cheese most time and find that it's just as good. Happy lunching!

DSC_0030

Spinach and Roasted Pepper Phyllo Pie

1 package phyllo
4 tablespoons butter, melted
3 eggs
4 ounces plain yogurt
1 large bunch spinach, stems trimmed and chopped
4 roasted red peppers, diced
1/2 cup black/purple olives, pitted and chopped
1 sprig of mint, leaves removed and sliced
1/4 cup crumbled feta cheese, optional
salt, red pepper flakes

1. Preheat oven to 350F. Heat a splash of olive oil in a pan. Add the spinach and let cook over medium-low heat until very dark and cooked through. Scrape the spinach into a large bowl.
2. Place the diced roasted red peppers, olives, and mint into the bowl. Break in the 3 eggs and add in the yogurt and stir well with a fork to combine. Sprinkle in the feta, if using, and season very well with salt and red pepper flakes.
3. Brush the bottom of an 8-inch square baking pan with butter. Keep your phyllo dough covered with some plastic wrap and a damp towel while you're working. Cut your phyllo into 10-12 inch squares (ie, slightly larger than your baking pan). Place about 3-5 sheets of phyllo into the pan, fitting them up the sides. Brush the phyllo well with butter. Repeat this two more times for the bottom phyllo layer. Scoop in the filling. Trim the phyllo to 8-inch square, and repeat with three layers of 3-4 sheets each, brushing each well with butter.
4. Bake the pie in the oven for 40-45 minutes or until nicely browned.

19 September 2013

Cilbir - Turkish Poached Eggs

DSC_0002

I've been traveling in the Middle East, and in Lebanon/Syria/Turkey for almost 10 years now, and where did I discover this simple Turkish breakfast dish? In London, my friends. Last Christmas, in London, we stopped into one of the few open places in Seven Dials, Kopapa, the sort of bustling warm inviting restaurant that I dream about when in Algiers. I will admit what really sold me on this dish was the menu description, especially the whipped yogurt and spice butter. Whipped yogurt? That's more of a siren song to me than any poached egg ever will be.

Since then, I've learned that poached eggs in yogurt with spiced butter is actually a classic Turkish breakfast dish called Çilbir. And there are naturally tons of ways to make these dish, but really it's fairly simple. Poach some eggs, place in a bowl, top with good quality yogurt and some paprika-tinged butter, and there you have it. Even people in Montana are making it.

I've come up my own variation on this classic dish, which is simply to serve the whole thing over toast and eat it with a knife and fork. I know, it's terribly British, isn't it? But the toast lends a much needed crunch and oomph to the dish. I bet you could even arrange them on a platter at a brunch. (Of course, in the pictures here you don't see the toast version because if I wanted toastable bread I would have had to make it.) If you want a more classic version of the dish, a few sauteed pine nuts are also nice for some crunch.

DSC_0001 DSC_0003

Çilbir - Turkish Poached Eggs with Yogurt
You want a thick not runny yogurt here, but I don't think you have to go full on Greek yogurt or labane here unless you want to. Really, whatever you like that's rich and tangy. Serves 2.

For the eggs:
2 eggs
water, vinegar

Assembly:
2 slices good toast
1 1/2 cups plain yogurt, the best quality you can find and preferably not fat free
4 tablespoons butter
one pinch of smoked paprika
a bit of dill or chives, optional, for serving

1. Beat the yogurt with a pinch of salt until smooth. Place the toast in the bottom of two shallow serving bowls.
2. Bring water in a medium-large pot to a low boil. Add in a splash of vinegar. Crack your eggs into ramekins or a bowl. With the handle of a wooden spoon, swirl the water to make a whirlpool. Drop one egg into the whirlpool to poach. When the egg white is solid but the yolk is still runny, scoop out the egg with a slotted spoon, let drain, and place on top of a piece of toast. Repeat with the second egg.
3. Spoon the yogurt over each egg. Heat the butter and paprika in a small pan and pour some spiced butter over each serving. If, desired, top with some dill/chives.

12 September 2013

Revisiting Hummus

DSC_1093
Oh yes. It's time to talk hummus. Again. It's September -- time for back to school, new jobs, more traffic, and half your office is no longer on vacation. And it's time to get serious, with hummus. For long time readers, you know I was pretty serious about hummus when I first posted about it here over five years ago. But I think it's time we talked about it again.

Some of the things I talked about many years ago have not changed - I still think you have to peel the chickpeas, I will still have a coniption if you call something with white beans "hummus." But a lot of things about my method have changed, and I'll explain why.

 DSC_1031
First of all, I have made hummus over a dozen times in the last two months. Luckily, you already knew I was a crazy person. When Paul sees another bowl of chickpeas soaking on the counter he now groans with dread. But all that cooking, testing this method vs that, soaking chickpeas, peeling them, not peeling them, all led me to a new and improved recipe.

DSC_1090
So what's changed? Well, you still have to cook your chickpeas from scratch to make good hummus, that has not changed. And yes, you still have to peel the chickpeas. But what has changed is baking soda. Yes, baking soda.

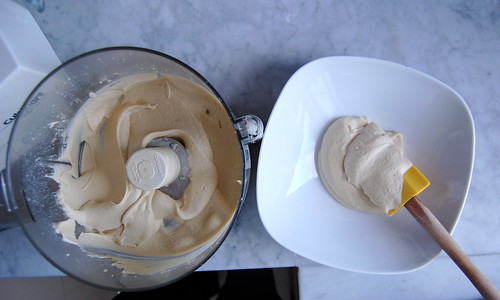
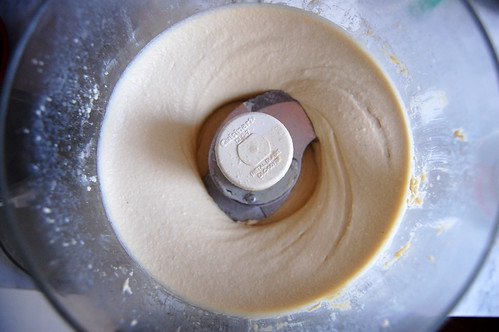
You see, a while back, I was eating at a Lebanese restaurant and noticed how soft, tender, and deeply yellow their chickpeas were. And I started thinking how a better technique for cooking chickpeas could lead to better hummus. Baking soda is a well-documented way to make chickpeas soft, tender, and yellow in color. So why didn't I use baking soda before? Well, before my recipe called for using some of the chickpea cooking water to thin the hummus, but chickpea cooking water with baking soda has an off taste. So, I've swapped that out with some cold water. I've also updated my recipe a bit to incorporate my own laziness, doing the whole thing in the food processor, instead of making the tahini sauce separately.

So go forth my friends, make some hummus!

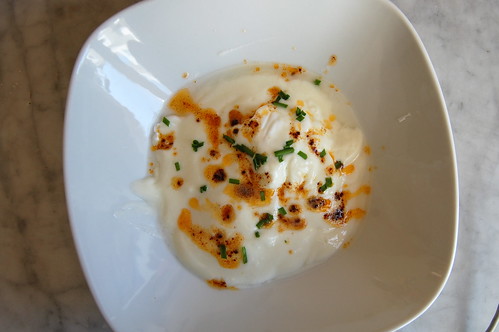
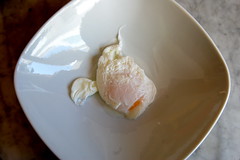
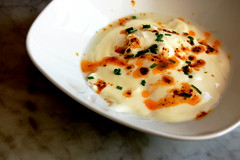
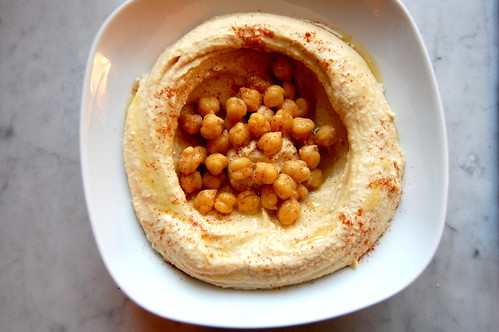
P.S. Notice how the hummus in the top photo looks smoother than the hummus in the bottom photo? Well, the bottom photo is form one of my experiments with unpeeled chickpeas. The difference in visible folks!
DSC_1121
Hummus bi-Tahini
The quality of your tahini makes a difference here, so try to find the best quality and freshest tahini (sesame seed paste) available. Baking soda does not interact well with pots with non-stick linings, so avoid using them here. This recipe makes more chickpeas than you may need.

2 cups dried chickpeas
1 teaspoon baking soda
1 very small clove of garlic
1/2 teaspoon salt (preferably sea salt or other good quality salt)
juice of 1 small lemon
scant 1/2 cup tahini paste (6-7 tablespoons)
for serving: olive oil, cayenne and/or cumin

1. Soak the chickpeas in plenty of water overnight, or for as long as 24 hours.
2. Drain and rinse the chickpeas. Add the chickpeas to a large pot, preferably a heavy-bottomed clay or ceramic pot, add the baking soda, and plenty of water to cover. Bring the pot to a boil, watching it closely because the baking soda may cause it to foam and overflow. When the water boils, lower the heat so that your chickpeas are just at a simmer. Skim off the baking soda foam.
3. Simmer the chickpeas until they are golden, the skins are loosened, and they are tender when squished with your finger, but don't totally turn to mush. For me this usually takes 40 minutes, but it could take up to 50-70 minutes.
4. Drain the chickpeas and give them a quick rinse with cool water. Now peel your chickpeas by simply pinching the skins off them. Transfer the peeled chickpeas to a bowl and discard the skins. You can choose to refrigerate of freeze your chickpeas here, or proceed immediately.
6. Measure out two lightly-packed cups of chickpeas into your food processor, reserving the rest for later. Add in the garlic and salt and run the food processor to create a coarse paste.
7. Add in the tahini and lemon juice. Turn on the food processor and process for 2-3 minutes, letting the mixture come together. Check how thick your hummus is, and taste for seasoning. You may want more salt. With your food processor running, add 2-4 tablespoons of very cold water, depending how thick/thin you want your hummus. Remember that your hummus will thicken as it cools so I tend to err on the side of a little looser mixture. Run your food processor for 2-3 more minutes so that the hummus is very smooth. Check for seasoning, it may need more salt.
9. Scoop your hummus into a serving container and let rest for 10-15 minutes for the flavors to meld. Place some of the reserved cooked chickpeas over your hummus. Drizzle olive oil over the top and sprinkle with cayenne and/or cumin as desired.

Ideas for hummus variations here.

Tips: 
1. If you plan to serve your hummus the next day, you can store it covered in the food processor bowl. That way, if it gets too thick, you can easily whiz it with a touch of water.
2. If you make your hummus too thin, you can add in some of your extra reserved chickpeas.
3. If you only have a blender (not recommended, but sometimes your only option), place the lemon juice in the bottom of your blender before the chickpeas. This will help the blender get going.

04 September 2013

Thoughts for September

DSC_0972
From the Independent's witty article on Algiers:
  • It is reminiscent of a 100-metre banana skin crossed with Oscar Niemeyer’s Cathedral of Brasilia.
  • Any initiative which alleviates the gloom of nocturnal Algiers is welcome.
  • The reputation of Algiers as one of the greatest beauties of the Mediterranean, a reputation that will require  Herculean renovation to regain. 
  • The whole ensemble is as seething, dirty and authentic as a historic Mediterranean port should be.
Ironically, the article neglected to mention that Niemeyer actually did erect several buildings in Algiers, including the dome on the Hydra stadium.
DSC_0969
From Sonatallah Ibrahim, 1962:

"Here is the artist’s role in Egypt today. Not to write something enjoyable merely for its aesthetic value. Not simply to lose oneself in philosophical and intellectual issues. Not to live captive to one’s individual experience, which could lead to loneliness or to feelings of alienation and absurdity. Not to be content with recording—impressionistically, neutrally, superficially—what happens in society. Instead, the Egyptian artist must work actively and with others. He must dive into the depths of the people and the depths of the individual. He must reveal the way forward, he must choose the direction and change the direction. He must lead and play a role in everyday life, armed with his technique, personal experience, self-awareness, persistence, and the readiness to sacrifice."

 I just finished reading Ibrahim's exacting roman a clef "That Smell," which was accompanied by this text, so apt for today. The work is a great quick read for anyone interested in Egyptian literature and is newly translated into English. More on Sonatallah Ibrahim in the New Yorker and Guernica.
DSC_0935
Also check out David Leibovitz's article on za'atar. And NPR's piece on Dead Sea salt!

Photos from Tipaza, Algeria. Back soon with a recipe!
DSC_0975